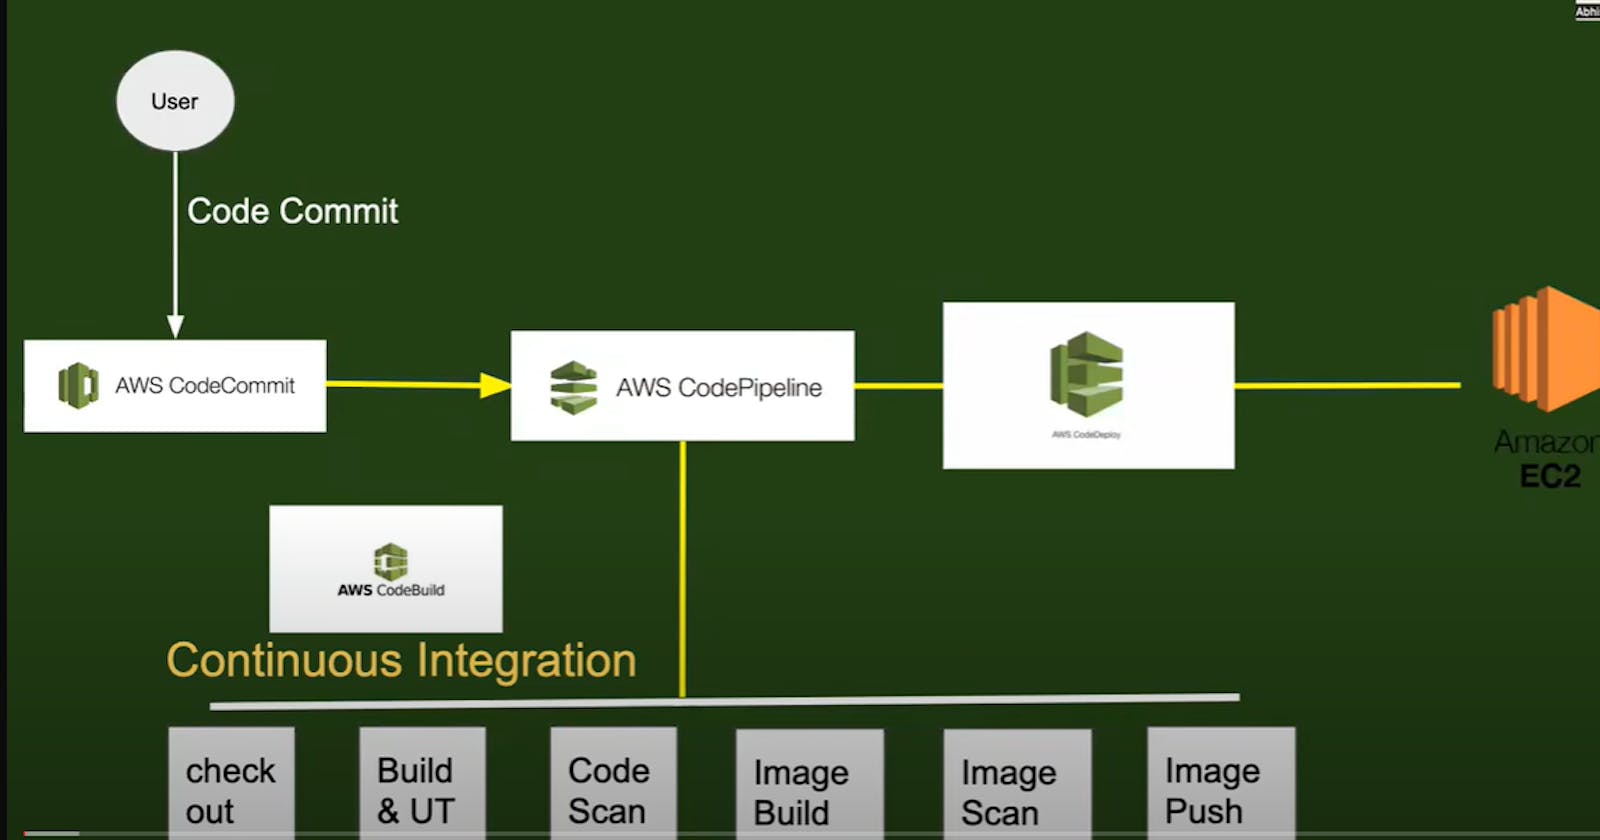
Configure AWS CodeBuild
In this step, we'll configure AWS CodeBuild to build our Python application based on the specifications we define. CodeBuild will take care of building and packaging our application for deployment. Follow these steps:
In the AWS Management Console, navigate to the AWS CodeBuild service.
Click on the "Create build project" button.
Provide a name for your build project.
For the source provider, choose "Github., and add the repository.
Configure the build environment, such as the operating system, runtime, and compute resources required for your Python application.
service role - create a new role
Specify the buildspec file as commands, such as installing dependencies and running tests. Customize this based on your application's requirements.
Set up the artifacts configuration to generate the build output required for deployment.
Review the build project settings and click on the "Create build project" button to create your AWS CodeBuild project.
BuildSpec file is :-
  version: 0.2
  env:
    parameter-store:
        DOCKER_USERNAME: "/kpapp/mydockerusername"
        DOCKER_PASSWORD: "/kpapp/mydockerupassword"
        DOCKER_URL: "/kpapp/url"
  phases:
    install:
      runtime-versions:
         python : 3.11

    pre_build:
      commands:
         - pip install -r requirements.txt
    build:
      commands:
        - echo "build docker image here"
        - echo "$DOCKER_PASSWORD" | docker login -u "$DOCKER_USERNAME" --password-stdin "$DOCKER_URL"
        - docker build -t "$DOCKER_URL/$DOCKER_USERNAME/simple-python-flask-app:latest1" .
        - docker push "docker.io/$DOCKER_USERNAME/simple-python-flask-app:latest1"
    post_build:
      commands:
         - echo "this is done"
  artifacts:
    files:
       - '**/*'
we use system manager service in AWS, to set the parameter of docker hub password and username.
Now go to IAM role>select role > and give permission of SSM.
Fantastic! With AWS CodeBuild all set up, we're now ready to witness the magic of continuous integration in action.
Create an AWS CodePipeline
In this step, we'll create an AWS CodePipeline to automate the continuous integration process for our Python application. AWS CodePipeline will orchestrate the flow of changes from our GitHub repository to the deployment of our application. Let's go ahead and set it up:
Go to the AWS Management Console and navigate to the AWS CodePipeline service.
Click on the "Create pipeline" button.
Provide a name for your pipeline and click on the "Next" button.
For the source stage, select "GitHub" as the source provider.
Connect your GitHub account to AWS CodePipeline and select your repository.
Choose the branch you want to use for your pipeline.
In the build stage, select "AWS CodeBuild" as the build provider.
Save the CodeBuild project and go back to CodePipeline.
run the build now----
now a new image pushed to my docker hub -
CD TIME -
Create a EC2 instance where we will deploy the python application.
In ec2 instance , for preventing the errors run the script . this script gives you the ability to install the code-deploy-agent-(Given in the readme.md) -https://github.com/krishkprawat/aws-ci-cd-001/
attach a role to ec2 instance which will access code deploy by the policies.By roles, services can connect to each other. now make the two roles- one is for ec2 and second is for code deploy. policies are- ec2 full access, code deploy full access, code deploy agent role etc.
Now create target group in code deploy - enter service role which have ec3 andn code deploy policies.
Now create the deployment for the application where we add some specifications and connect through github. appsepec file is a yaml file which have stages for application .
  version: 0.0
  os: linux

  hooks:
    ApplicationStop:
      - location: scripts/stop_container.sh
        timeout: 300
        runas: root
    AfterInstall:
      - location: scripts/start_container.sh
        timeout: 300
        runas: root
Customization of Deployment Process: AWS CodeDeploy allows you to customize your deployment process to meet the specific needs of your application. The configuration file defines how the deployment should proceed, including any pre-deployment and post-deployment steps, scripts, and configurations. This customization is essential because different applications may have different requirements for deployment.
Lifecycle Event Hooks: AWS CodeDeploy operates based on a set of predefined lifecycle event hooks, such as "ApplicationStop" and "AfterInstall," as shown in your example. These hooks define when and how specific actions or scripts should be executed. The configuration file is used to specify what actions should be taken at each hook, allowing you to tailor the deployment process to your application's requirements.
Timeouts and Permissions: The configuration file also specifies timeouts for each hook, ensuring that the deployment process does not hang indefinitely if something goes wrong. Additionally, it defines the user under which scripts are executed, which can be important for security and access control, as well as ensuring that the necessary privileges are available for each script to run successfully.
add CD part in code pipeline-
click edit button and add a New stage, add action group, deployment group and create.
EVERYTHING IS READY NOW, modify some files and push them into repo - pipeline will trigger and a new image will be pushed to docker hub.
thanks for reading... github repo for this project is - https://github.com/krishkprawat/aws-ci-cd-001

